🐣 (Easter!) Cookies with Toasted Coconut and Lime 🐣

12842505_10156733540335165_200301340_o-001

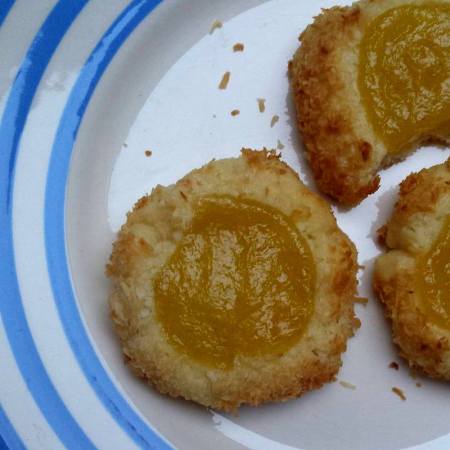
Let me preface this recipe by saying… these cookies aren’t very pretty. They sort of look like funky little fried eggs. And while I’ll choose flavour over frill any day of the week, I struggled a bit with coming to terms with their appearance. But, rustic look aside, they taste really great, and all of the batches I’ve made have disappeared in record time.

I’ve loved the coconut-citrus combo ever since I had some completely delicious little lemon and coconut cookies in a small Copenhagen café, about 5 years ago. I was in the last stages of thesis-writing, and, having just dropped my thesis off at the printers’, my nerves were frayed! No more proof-reading once the tome had been handed off to be bound, as I’d resigned my perfectionist self to not even taking a peek at it again once printed, for fear of finding some spelling mistake or who knows what, that would annoy me to death (or, at least, until my thesis defence, after which I’d most likely never give the whole thing another thought, ever again).

So, about the cookies. I have such vivid memories of them, and the little café, right down to the froth on the cappuccino I consumed whilst waiting for the printers’ to do their thing. They were simple little shortbread kind of cookies, but softer, slightly chewier. Just such a lovely, zesty memory from the thesis-writing fog, one  that seems to have kick-started an almost yearning in me for all things citrus and coconut. And tragically, I haven’t managed to find some like them ever again, or reproduce the shortbready-but still soft and ever so slightly chewy goodness that was those cookies.

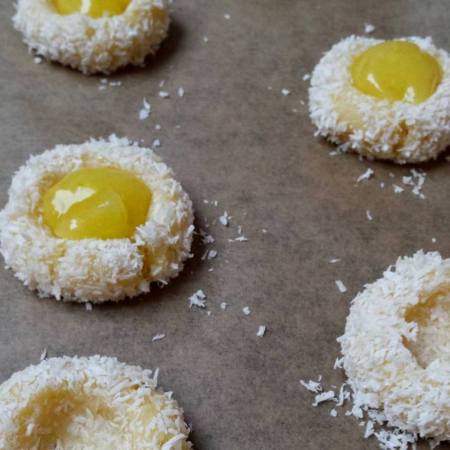
But I think these finally hit the spot, so much so that I’ve managed to get over the fact that they look a little odd. And although I think they’re great for all year round cookie consumption, the fact that they sort of look like eggs, or very strange little birds’ nests, is very fitting this time of year (Easter and all).

They also keep really well for a few days! While I find that regular thumbprint cookies get a little boring and stale after a day or two, these actually get better, in my opinion (although I’ve only tried up to two-day old ones, as I just happened to have overlooked two in a tin at the office, which, upon my eating them, cemented my faith in the yumminess of this cookie). So yeah, rough around the edges toasted coconut and lime cookies, for Easter, or when you just happen to need a coconut-lime boost, and don’t care if it comes in the shape of a fried egg-looking kind of treat 🙂

The first time I made them, I found that I wanted a more proportionate curd to cookie ratio, so the second time around, I made the cookies smaller, and the dent slightly bigger, to allow for a tad more lime curd. The third time, I added even more lime curd, about a scant tsp per cookie. I really love the zestiness of them, and the fact that they aren’t too sweet! If you’re not heavily into tart desserts and treats, maybe stick with a regular-sized thumbprint, and a little less curd 🙂 But I think the lime curd is really what this cookie is all about, and that it off-sets the butteriness and goes so so well with the lightly toasted coconut. So if, like me, you’re into seriously zingy desserts, don’t be afraid of piling on the curd, even if it makes the cookies look a little less than elegant 🍋 😉

Toasted Coconut and Lime Cookies
Adapted from Well Plated by Erin, yield: 24-30 little cookies

  • 230 g (1 cup/2 sticks) unsalted butter, softened/room temperature
  • 140 g (2/3 cup) sugar
  • 1/2 tsp sea salt
  • 250 g (2 cups) flour
  • 1 egg white
  • about 100 g (1 cup) unsweetened desiccated/shredded coconut
  • 120-240 ml (1/2-1 whole cup) homemade or store-bought lemon or lime curd (for a quick homemade lime curd recipe, see below), depending on your preferred curd to cookie ratio 😉

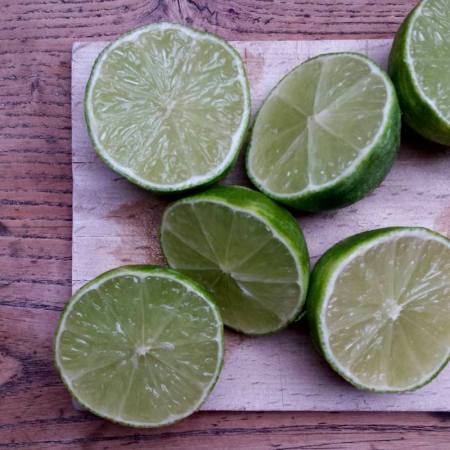
If making your own lime curd, begin by whisking together 1 large egg and the juice and zest of 2 limes in a small saucepan. Add 1/2 heaped tsp corn starch, 75 g sugar and 50 g cold butter, cubed, and begin to heat the mixture up over medium heat, whisking throughout, until the ingredients melt together and the mixture begins to thicken and simmer. Once the curd is beginning to thicken, turn the heat down to low, and leave to simmer for about 5 minutes, stirring once in a while. Transfer to a bowl, and leave to cool down while you make the cookie dough.

In a large bowl, mix together the softened butter, salt and sugar. A wooden spoon works just fine, provided your butter is soft enough. Add the flour a little at a time, until it’s all incorporated, but try not to over-mix.

12837467_10156733547465165_1425509344_o939162_10156733546455165_1770081774_o

Preheat your oven to 175°C/350°F. In one large, shallow bowl, mix an egg white with 1 tbsp of water, to make an egg wash. In another large, shallow bowl, pour in your shredded coconut.

Roll little half-walnut sized balls of dough between your hands, then dip into the egg wash, and roll in the coconut. I prefer to do the dipping with one hand, to keep the other hand relatively clean for rolling purposes… 🙂 But it doesn’t matter much, if some egg wash and coconut from your fingers gets rolled into the cookie!

12675111_10156733541610165_2080267390_o12422177_10156733540545165_535116361_o

Place on a baking sheet covered in baking parchment, about 3-4 cm/1 inch apart, to allow for the cookies to spread out a little (they will spread out both when you press into them to make the thumbprint, and as they bake). Make a generously sized indentation in each cookie, thereby flattening it and leaving a border around the centre of the cookie (I either make three smaller dents next to each other, or wiggle my finger around to make the dent wider than a normal thumbprint). Fill the dent with as much lime curd as you think you want, I’d go for a scant tsp 🙂

Bake for 10-12 minutes, or until the coconut begins to get that nicely golden, toasted look. Leave to cool completely on the baking sheet, then transfer to a cookie tin/container.

And munch away 🙂 🐣


🌲⛄Thumbprint Cookies and Jødekager⛄🌲

12364152_10156417536435165_1849889310_o-00512369819_10156417540290165_768414728_o-00112364152_10156417536435165_1849889310_o
12369819_10156417540290165_768414728_o12364152_10156417536435165_1849889310_o12369819_10156417540290165_768414728_o

I wasn’t completely ready for it to be Christmas this year, to be honest. I feel as though the past year just whizzed by, and wasn’t it just Christmas 2014? But then the last week of November rolled around, and I started to feel the tingle of anticipation creeping up on me. Last weekend we decorated my flat, and I bought a ridiculous amount of fairy lights.

So my Christmas excitement is once more alive and well, and I’m not even going to apologise for the explosion of snowflakes, Christmas trees, candy cane hearts, and snow men on this page. The fairy lights are up and the baking has begun.

Although I’m generally very much against fussy recipes, for some reason most of the Christmas cookie recipes I grew up with, and HAVE to make each year because I love them, are all a bit finicky. But a few weeks back I stumbled across the easiest, and no less delicious for it, Christmas cookie recipe. It’s even versatile. It’s most definitely going to be part of the annual Christmas cookie baking bonanza, and I may or may not have eaten a few dozen of them already.

These super moorish little thumbprint cookies are kind of like a shortbread cookie, but a little lighter (because of the baking soda), tender and crunchy at the same time, with a lovely little jammy centre 🙂 I used raspberry jam, and it was perfect, these cookies definitely need a slightly sour, or tart, sort of jam I think. I’m also going to try apricot, and maybe also some lemon curd. I think these would be killer with homemade lemon curd.

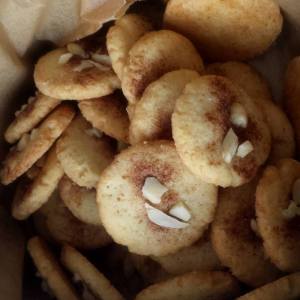
The first time I made this cookie dough I only made the thumbprint cookies, but the texture of the cookie made me think the dough would also be perfect for Danish jødekager (‘jødekager’, which translates as Jewish cakes, purportedly got their name because they resembled a type of cookie/biscuit that was traditionally sold in Jewish bakeries and shops in Copenhagen a few hundred years back), a crispy little cookie with cinnamon sugar and chopped almonds on top. I make these every year, each time using a different recipe because I can never find one I’m completely satisfied with. Until now, that is 🙂 I made some last year that I thought were perfectly lovely, but these are so much better, and so much quicker to make since there’s no faffing about with rolling pins and cookie cutters (even if I LOVE my cookie cutters – and my friend recently gave me a dinosaur-shaped one that I have yet to use!). I brought them to the office glühwein (or ‘gløgg’, in Danish) party this Thursday, and they all disappeared even though the table was almost completely covered in Christmas goodies, and I ended up taking about half of the thumbprint cookies back home with me (not a problem, they have now vanished). I think these would also make for really lovely snickerdoodles, were they to be rolled entirely in cinnamon sugar, and flattened slightly less than you would to make the jødekage-variation.

To make the jødekager, follow the instructions beneath the thumbrint cookie recipe. To make both, use half of the dough for the thumbprint cookies, and half for the jødekager (or however you want to split it, should you want to make both variations).

❄Thumbprint Christmas Cookies❄
Adapted slightly from Epicurious – makes about 4 dozen little cookies

  • 225 (1 cup/2 sticks) butter, softened
  • 150 g (3/4 cup) sugar
  • 310 g (2 1/2 cups) flour
  • 1/4 tsp baking soda
  • 1/4 tsp salt
  • 1 egg
  • 1 tsp vanilla extract
  • about 1/2 cup/120 ml jam
  • Icing sugar for dusting (optional)

In a large bowl, beat butter and sugar together on medium until nice and fluffy. Add the egg and vanilla extract, beating for another minute or so.

In a small bowl, whisk together the flour, salt and baking soda (I don’t always have the patience for sifting, and whisking the ingredients together with a hand whisk usually means it’s ok to skip this step).

Add the dry ingredients to the wet, mixing with a silicone spatula until everything is just combined. I use my hands to press it together at the end.

Ideally, cover the dough and let it sit in the fridge for at least 30 minutes. I didn’t do this for the first batch though, and they were fine.

Roll little 1½ cm / ½-inch balls of dough between your hands, and distribute evenly on a non-stick baking tray, leaving at least a few cm between the cookies. Don’t make them too big, as they will expand slightly, and the bigger they are, the more they’ll spread out. You want it somewhere around the size of an unshelled hazelnut, if that makes sense! The original recipe calls for them to be a little bit bigger, about twice the size of mine, but I prefer them smaller, as I find that the bigger ones expand too much and make for a less satisfying cookie-to-jam ratio.

Press a nice, deep indentation into each cookie – I find it easiest to use my pinkie or ring finger, holding the cookie steady between the thumb and index fingers with one hand, and pressing down into the cookie with the pinkie finger of the other hand, giving it a little wiggle to gently expand the hole. Scoop about 1/4 tsp of jam into each ‘thumbprint’, just enough so that it peaks out from the indentation.

Bake for about 10 minutes at 175°C/350°F, taking them out when the edges begin to brown a bit. Let cool on the baking sheet for about 5-10 minutes, then transfer to a wire rack to cool completely. While one baking sheet is cooling, roll more little cookies out, place them onto a second baking sheet, make the thumbprint/fill with jam, and bake. Repeat this rotation about 4-5 times, until you run out of dough, each time letting the baking sheet cool before you place the fresh batch of unbaked cookies on it.

Collages12380715_10156417568615165_809082196_o12359515_10156417536750165_1275281540_oCollages

Dust lightly with icing sugar, if desired 🙂 keep the cookies in a cookie tin, separated by layers of baking parchment.

Jødekager

  • One/one half portion of the cookie dough above
  • Cinnamon sugar (I just mix unprocessed cane sugar with ground cinnamon in a cup, I don’t really measure!)
  • 25 g whole almonds, blanched and chopped roughly

Blanch the almonds: pour boiling water over them in a small bowl, cover them, and leave them for about 10 minutes, whilst the skins loosen. Then pour out the hot water, and squeeze the almonds out of their skins. Chop chop chop them up roughly.

Collages12356279_10156417537535165_1517144519_o-00212364052_10156417536210165_734340101_oCollages

Shape the cookie dough into little balls, about the size of an unshelled hazelnut/1-1½ cm in diameter. Place them on an ungreased, non-slip cookie sheet. Press the cookies flat with the ball of your hand, so they’re about 2-3 mm thick. Sprinkle cinnamon sugar on top in a sort of stripe through the middle, then press a few bits of almond on top. Bake for about 9 minutes 175°C/350°F, until they only just begin to brown around the edges. Let cool for a few minutes on the baking sheet, then transfer to a wire rack to cool.

The thumbprint cookies keep for a bit more than a week, but are best the first two days, after which they tend to get a bit stale and the jam loses it’s glossy sparkle. I’m thinking I may try to make them thinner, and coat the thumbprint in egg wash next time, this might allow for the cookies to keep for a bit longer without going stale (the thickness of the cookie, along with the moistness of the jam means that the cookie loses it’s ‘crunch’ after a few days).

I suspect the jødekager keep for much longer, since they’re crispier and don’t have the jam moistness ‘issue’. But I will report back 🙂

FYI – this dough is actually best used at room temperature, or it ‘cracks’ around the edges when you smush it down. If your dough is fridge-cold and you don’t have time to let it sit, I would roll it out into a log, and cut it as finely as possible, with a sharp, thin knife (for the jødekager, that is, for the thumbprint cookies it’s not a huge problem as you don’t need to flatten them quite as much). The dough will keep in the fridge for several days, but is easiest to work with on the day it’s made (and since it’s so quick to make, this isn’t really an issue, in my mind 🙂 ).

I’m also thinking of making these with nutella or something similar. Or maybe a dark chocolate variety, although they’d lack the chewiness of the jam, once cooked. Ooh, and I also think a tart cherry jam would be really lovely with these!

🌲🌲🌲🌲🌲🌲🌲🌲🌲🌲🌲🌲🌲🌲🌲🌲🌲🌲🌲🌲🌲🌲🌲🌲🌲🌲🌲🌲🌲🌲🌲🌲🌲🌲🌲🌲🌲🌲🌲🌲